Intro

A miniatures games blog about Warhammer 40k, 15mm American Civil War (ACW), D&D, Classic Battletech, painting, terrain and anything else that rolls or shoots...
Showing posts with label Painting. Show all posts

Tuesday, November 30, 2010

The Chief

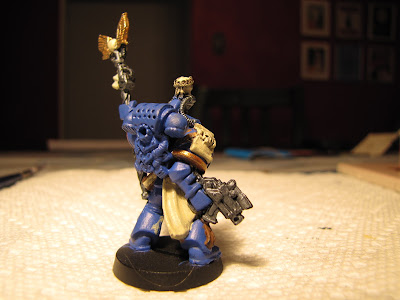
At last...my newly re-vamped Ultramarines army is just about ready for war (again!)  While the army itself wasn't in bad shape before, I thought it needed a few tweaks to be a little more passable in both the looks and gaming departments.  In the last month, I've added a ten man squad of Sternguard Veterans and given a shoddy looking squad of Devastators a new coat of paint.  The final piece of the puzzle lay in a miniature I purchased on one of my many teenage trips to the hobby shop with a burning pocketful of minimum-wage McDonald's earnings.  At this point in time, I'd already moved on from the Space Marines to more destructive (Imperial Guard) and sexy (Sisters of Battle) armies and just kept the Ultramarines around as options for allies or the occasional solo game when I needed an army to play against.

Basically, I picked up this mini because he looked sweet.  But not sweet enough apparently, because it sat untouched for years.

Upon getting the new codex for the Space Marines, the first thing I did was go right to the special characters to see how they'd changed in the last decade.  I have to say I was pleasantly surprised.  Right off the bat, I noticed there was a much larger selection to pick from than I had first anticipated with nine in all compared to the three or four available in the Second Edition Codex: Ultramarines.  I realize that some of these new characters are chapter specific but it's nice to see new faces like Cato Sicarius and Scout Sgt. Telion who can add some flare to what some would call an otherwise bland choice of army.

One of the more powerful options is Chief Librarian Varro Tigerius.  For the newly initiated, a Librarian is the Space Marine version of a psyker, which in turn is the 41st millennium's version of a wizard.  Magic is no longer drawn from spellbooks and scrolls, instead it comes from an individual's mastery over the Warp.

In game terms, Tigerius is a psychic badass when it comes to options for the Space Marines.  As a Master Psyker, he automatically knows all nine psychic powers available to the Marines (a normal Librarian can pick two) and he can use up to three a turn, where lower level Librarians can only use one or two.  With two wounds and WS 5 (weapon skill), he's not a bad buy at 230 points...especially in a medium sized game where he can really make a difference.

At this point, a light bulb clicked on in my head and I scuttled off to the miniatures vault (the basement) to take a look.  My suspicions were confirmed when I opened a dusty box to find the long-forgotten Chief Librarian still in his faded 1998 packaging.  Knowing this was what I needed to finish off my army, I got to work.

I started off by priming him with an undercoat of black and then thought about spraying him with another undercoat of navy blue, but decided there wasn't enough actual armor showing to warrant this.  Instead, I would paint him entirely by hand.  As you can see from the picture below, I'm not quite sure what I was thinking because at least half the model is clearly power armored.  *facepalm*

What should have taken me half the time to do, ended up taking me around 90 minutes.

Basecoat #1


As you can see, I used a base of brown for everything that would eventually be a parchmenty / bone color.  I then layered on Bleached Bone and added some preliminary touch-ups.

The second assault.


As I said above, at this point I'd been working for around 90 minutes and with my old-man neck in a state of semi-paralysis as well as having a football game to watch, I decided to put him down for the day.  In the past, especially with uber-detailed minis like this one, I've always found it advantageous to get as far as you can and then take a step back and put it down for a night.  It allows me to refocus and not get burnt out, which then lets me pay attention to all of the little stuff on these minis that really sets them apart from the rest of the riff-raff on the table.

When I came back the next day, I spent another 90 minutes filling in the rest of the details like the staff and ornamentations on his armor.  I then did a little bit of shading and highlighting and here is the result!


Overall, I'd say that I'm super happy with the results.  I think this is one of the better mini's I've painted, especially after coming off a decade-long layoff from the hobby.  It probably took me a lot longer than it would for a regular painter, but for three hours of work I think it came out pretty well!

Now that I have a fairly presentable army, the next step is to get myself into a couple of scraps and see how these new fangled rules have changed the game I love so much.  Stay tuned for battle reports and because a gamer's job is never done, my next project...the Imperial Guard.

Tuesday, November 23, 2010

Stripping Space Marines Pt. 2 (now with tassles)

With a full head of nerd-steam following GaspCon I decided to keep momentum going and plunge back in to my 40k Ultramarines army, slowly but surely getting them ready for their return to battle.

A couple weeks ago, I showed you how to remove ugly paint jobs using a cheap and easy-to-find household cleaner called Simple Green.  One thing I forgot to mention is that before priming any miniature you've chemically stripped, it's a good move to give it a quick run through soap and hot water just to get all the little crumbs of paint/glue/chemicals off and make sure you're starting with a clean base.

As soon as these guys dried off I sprayed them with a base coat of Navy Blue from The Army Painter. Way back in 1998, Games Workshop used to have a line of spray paints in popular shades like Ultramarines Blue, Blood Angels Red, etc.  It seems like these would still be fairly popular, especially for marine armies, but much to my chagrin I found that GW had discontinued them and I was forced to go elsewhere.  While I was looking at their Quickshade line, I noticed that The Army Painter had a line of undercoat colors similar GW's and not wanting to paint a squad of Space Marines by hand, I figured I would give it a go.

Undercoat courtesy of The Army Painter - Navy Blue Color Primer

I followed this up with the basic details that come with every Space Marine.  I used GW's Red Gore for the shoulder pads, Sergeant's helmet and weapon casings because I like the darker, grittier tone more than the standard Blood Red, which just seems a little too bright for me. (note: despite my monetary grudge against GW you gotta love their paint names...Snot Green and Vomit Brown anyone?) 

I followed this up with Boltgun Metal on the guns and Shining Gold for the chest pieces.  That left only the purity seals on legs and chests of some of the models.  To get that old parchment look, I find that a coat of dark brown followed by a quick dry brushing of Bleached Bone or any other suitable off-white color works best.


So far, so good!  They're already looking a lot better than their previous incarnations which could be compared to the the handiwork of an infant monkey.  This just left the touch-ups and basing.

Almost there!

Finally, I gave them a quick bath in THE DIP (see my earlier post about Quickshade for details) and set them out to dry overnight.  I came back the next day and gave them a once-over with the Anti-Shine and voila!  I'd like to make a quick note regarding the application of the Anti-Shine.  I've found that models need VERY LITTLE of this to get the desired effect.  On these minis I think I might have gotten overzealous with a couple passes too many and had to touch up some areas that had gone a little white from varnish build-up.  No biggie...just something to watch out for.

So in the end, with some elbow grease, an adventurous spirit and a tight wallet I took four shoddily painted Devastator Marines from this:


To this! (You'll notice the addition of the lost fifth Missile Launcher on the right to complete the squad.)

Reunited!
 I am definitely going to use this technique again in the future, as there are all manner of horribly painted, cheaply priced miniatures for sale on Ebay just begging to be re-habbed.  All told, from the start of the stripping process to taking the last picture, I did about three hours of actual work.  It's a pretty nice feeling to know you've rescued perfectly good miniatures from bad-paint hell and given them a second lease on life...at least until they're blown up on the battlefield.  


Wednesday, November 10, 2010

Stripping Space Marines Pt. 1 (they're just doing it for tuition money)

Hello again!  It's been a busy week in grown-up world but I was still able to set some time aside to continue work on getting my Ultramarines up-to-speed and ready for the 40k table.  As a long-time player of both Space Marines and Imperial Guard I've always been enamored with big guns.  I could never quite see the appeal of speedy, assaulting armies like the Orks and Eldar.  Instead, I prefer to sit back and blast away, using close combat as a last ditch alternative to incineration.  For a Space Marine player, large-scale destruction like this can be helped along with the tried-and-true Devastators.

One of the main things I've noticed in my absence from the game is the prevalence of really gorgeous looking plastics that Games Workshop is now putting out.  "Back in my day," a plastic kit usually consisted of about 20 miniatures in identical poses with pre-set arms/weapons that slotted on and provided about as much variety as a box of black crayons.  These days, you can arm your models with all manner of guns/swords/bombs and put them in any pose your twisted brain can think of.  All for the low low price of your left arm and leg.

Now,  if I was my 15-year-old self again, I would have plunked down $40 of my hard earned pet-sitting cash in a minute and walked out with a fancy new box of models.  Sadly, 28-year-old Rob has a mortgage, gambling debts, bar tabs and a recent plumbing disaster (see also: the day our kitchen ceiling rained down upon us) to pay for and that leaves little room for plastic men.  I did however, have an old squad of perfectly usable, yet shoddily painted Devastators sitting in the basement.

Before...


As I said before, my main reason for getting back into the hobby was to test my meddle in competitive play.  Judging by the way painting has advanced over the last ten years, I'm pretty sure putting these down on the table would get me negative painting points as well as laughed out of the store by my pre-pubescent opponent.  You may also be saying right now, "But Rob, where's the fifth marine?"  Well, he went missing in the fog of war some time ago and was replaced with a more respectable looking missile launcher-toting companion (read: doesn't need a new paint job) who you'll see later.

I'd done a little bit of research into the art of stripping paint off of miniatures and all signs pointed to something which I already had under the kitchen sink.  I give you, Simple Green!

It works on cat vomit AND miniatures!

You can find this at any Home Depot, Lowe's, Wal-Mart, etc. for $8 and it's well worth it.  Make sure you get the concentrated variety though...none of that pansy diluted garbage.  The next part is easy....fill up a cup and drop them in.  I was able to fit all four marines comfortably in a beer pong regulation sized Solo cup.

Send that crappy paint job off to die!

Some reviews I read said this stuff takes as little as 20 minutes to start working, but after 20 minutes I'd noticed no difference and by then it was time for me to head out and work on the aforementioned bar tab so I decided to leave them overnight.  Acting on a tip, I'd tried this once as a lad with a coffee mug, acetone and some plastic Space Marines.  When I awoke from the fume-induced stupor, I was greeted with five grey blobs that resembled rocks with legs.  The great stuff about Simple Green is that it's non-toxic AND nice on plastics so you won't be melting anything.

Just about 12 hours later I pulled them from the cup and was greeted with this...you'll notice the paint is bubbling and lifting up nicely.


The agony!!!! Why???


Now the fun part, I used a firm bristle toothbrush (old of course) to scrub off the old paint.  Dipping the brush in Simple Green also seemed to help the process along.  It worked well but I think if I did this again I would get some smaller, wire bristle brushes that are used for stripping stain and paint off of larger household objects.  These can also be found on the cheap at your local mom & pop hardware mega-store.


After a few minutes of scrubbing, you can see that almost all of the paint has come off, leaving nothing but shiny, expensive metal!

A new lease on life (sans arm)


I used an X-Acto knife to get into the little nooks and crannies and remove the rest of the stuff that the brush couldn't get at.  Tedious? A bit, but still easier and more rewarding than forking my booze money over to The Man.  In the scrubbing process, his arm did pop off, but that was due to the glue being weakened by the Simple Green.  The plastic itself was unharmed and perfectly reusable. My plan however, was to do a replacement of all these little parts with extras from my Bits Box (or so I thought)...


The aftermath


Once I had finished with the scrubbing and calmed down my fiancée, I tossed the old limbs in the trash and set the minis out to dry before resuming work a couple of days later.  To my horror, I realized that I had over-estimated the contents of my Bits Box...I only had three usable left arms. THREE!!! DAMMIT!!!

So, with the help of my ever-loving lady (who I now owe big time), I dug through the garbage to find a little plastic left arm to re-use...I like to think the vomiting was worth it.

After!!!


There you have it...in Part II we'll get these chaps on the painting table and move one more step closer to putting this second chance army on the battlefield!

Tuesday, November 2, 2010

Switching Gears

As Paul had mentioned a few days ago, we are going to be attending GASPCon XI  next weekend at Pittsburgh's beautiful and historic Best Western in the Parkway Center Mall.  For me, this is going to be a landmark event as I've never attended a large-scale convention before so I'm not totally sure what to expect.  What I do know is that nobody can host a convention like Pittsburgh, who is famous for such annual gatherings as Anthrocon:

Furries!

And let's NOT forget the International Bridge Conference, an entertainment juggernaut in it's own right...

I think all those overturned water glasses speak for themselves.

It's safe to say that the bar has been set fairly high and I expect nothing but good things from my first convention experience.  In particular, I'm looking forward to the Classic Battletech 'Poker Run' event.  You can take a look at the rules here, but the basic jist of it is each person brings one 'Mech to the table, and you get playing cards by holding objectives and damaging enemy 'Mechs.  At the end of the fight, the person with the best poker hand wins the game.

I decided speed and firepower would be key and settled on a shiny new Marauder-3R to get the job done.  It has decent speed, packs a wallop with two PPC's and a low Battle Value means I'll be hitting almost everything I shoot at.

Everybody knows that a painted mini kills better and after spending entirely too much time on the Space Marine Sternguard Squad, I thought a 'Mech would be a nice change of pace...so let's get to it!

1.  I started out with a dark grey basecoat:

Stormy Grey

2.   To start bringing out detail, this was followed up by drybrushing a slightly lighter shade on top.  For those of you (like me) who don't have time to bother with mixing your own shades for this, Reaper Miniatures sells 'Triads' of three paints in varying shades.  For this 'Mech I used the Neutral Grays set.

Stormy Grey + Cloudy Grey

3.  At this point, I filled in details on the 'Mech like regimental colors, cockpit glass and gun metal.  After this was done, I lightly drybrushed on a third shade of grey.

Stormy + Cloudy + Misty Grey (seeing a pattern, here?)


4.  Now, at this point, most purists and professionals would start yammering on and on about applying washes, inks, more drybrushing, more inking, sandwich making and five more shades of grey.  Call me a cheater and heretic, but I don't have time or the patience for this for this.  Thus, I'm going to tip you off to a little gem I recently discovered called Quickshade by a company called The Army Painter.  In short, "Dipping" is a technique wherein one takes a miniature and literally dips it into a pot of watered down, inky paint-like...stuff.  With a little help from gravity, the ink then settles into the cracks and folds of the model and dries dark.  This creates a really neat shading effect that the pro's spend hours on. Suckas.


INTO THE DIP

So, I dipped the 'Mech into a pot of Quickshade "Dark" Tone and let him rest.  The important thing to remember about this stuff is at needs a good 12 hours at least to dry completely.


5.  Last but not least, I based him using a no-frills technique of green paint, Elmer's Glue and some Woodland Scenics flocking.  If you are interested in the Quickshade, one thing to remember is as well as being a sweet shortcut, it's also a varnish and dries shiny.  For this, the folks at The Army Painters have created an Anti-Shine spray.  You don't need much of this at all, just a few very quick passes over the front and sides of the mini and it's done!  Note: MAKE SURE THE QUICKSHADE IS COMPLETELY DRY BEFORE APPLYING THE ANTI-SHINE. If it's not, it'll turn everything white.


6.  Go to the convention and kick some ass!

Wednesday, October 27, 2010

A Little Piece of History

The first thing I did upon deciding to throw my hat back into the Warhammer 40k ring was run over to my Friendly Local Gaming Store and spend my paycheck on copies of the new (to me) rules and the appropriate codex for my chosen army.  I've never tasted competitive play before and this was one of the main reasons I wanted to come back into the fold in the first place.  Glancing through the Imperial Guard codex, I realized that my army, while perfectly legal by the ancient Second Edition standards, would need a lot of work to be brought up-to-date for Fifth so I decided to fall back on my tried and true Ultramarines.

No sooner had my fingers touched the Codex: Space Marines when I was heckled by a young punk playing in the Magic tournament being held at the store (ironic, huh?)  He seemed to think I should have chosen the Tau because "they rule."  When I responded, "Who the fuck are the Tau?" he looked at me blankly for a second and turned away, shaking his head and muttering something he's probably glad I didn't hear.  Whatever...I was rolling dice when his mom was still wiping his ass.  Besides, he smelled funny.  I guess some things never change.

Codex and rulebook in hand, the second order of business was to beef up my army.  Veteran Marines have gotten a big boost in the new rules (something I will cover a little bit later) and I thought a squad of Sternguard would be just the ticket...I even had the perfect models for the job.

Wayyyy back in the late 90's, Games Workshop used to have a nifty "outlet" section on their website where they would unload older, discontinued models at a fraction of the original price.  One such deal was a 10-man squad of original Space Marines from the glory days of Rogue Trader circa 1987.  Being a student of the game, I hopped on this deal but never got around to painting them up.


What better models to represent hardened veterans than some of the first Space Marines ever produced?

What I thought would be a walk in the park in terms of painting actually took me much longer.  My nemesis in this venture turned out to be the white.  Dear God...the white.  One thing I've learned about being a grown-up is that time is of the essence, and it's a rare day when you can spend 3-4 hours painting little soldiers.  Thus, I had to spread this work out over four days of roughly 90 minute sessions.  I actually think this helped me out in terms of keeping my sanity from the monotonous task of painting and re-painting the white....oh the white.

For my first large-scale effort, I think everything turned out pretty well.  The castings themselves didn't do me any favors and there were a few molding issues I had to work around but that's all part of the fun, right?  So they say.

Ready for war!

Despite the painting issues, it did feel pretty cool knowing that I was painting a little piece of Warhammer 40k history.  It's interesting to see the way sculpting and casting techniques have developed over the last 20 years. 

Sergeant w/ Chainsword & Hand-Flamer
I have to say though, my favorite part about these marines, and something I really think GW should bring back are the BEAK HELMETS!

Not quite sure what the guy on the right is holding, but we'll call it a storm bolter!

The Emperor's Finest


The Emperor's Finest (boyband)

My favorite model of the bunch though, by far has to be the one who breaks all fluff convention.  No helmet, no gloves and a plasma gun.  Really?


Badass.

For heavy weapons...there's this guy, with his skinny lil' legs.  I'm not quite sure what he's packing, as it kind of looks like a lascannon, but on the back of the model, there are rockets hanging off his pack.  I guess it could be either?

Space Marine with....thing...


I've always had a self-imposed rule of not allowing myself to field a unit unless it's fully painted.  This has been the cause of much consternation before, but it's always kept me motivated to keep on moving.  With this squad completed, I've got a couple more units lined up and then this army should be ready for war!


Friday, October 22, 2010

This is our blog, which is totally about Texas Hold 'Em.


As the other contributor to this blog, I'll introduce myself as well. I'm in a pretty similar situation to our fearless leader here. 28 years old, gainfully employed, living with my (surprisingly supportive) lady friend, and after a long hiatus, getting back into the swing of serious gaming.

I came to find miniatures gaming when I was about 12. I can't remember how exactly I found it; it may have been through the first Battletech video game, or maybe randomly because I was a kid who was really into the idea of giant robots. I got my parents to buy me the old Battletech boxed game, back in the day when FASA was still owner of the rights, and the Japanese hadn't sued them to make all my favorite 'Mechs look dumb as heck. I took to it quickly, and soon had amassed an enormous stack of sourcebooks, which eventually came to include an awful lot of RPG stuff as well (mostly Shadowrun, the Star Wars RPG, and Rifts). It was way easier to find Star Wars nerds to play RPGs with, but I really loved Battletech, and despite not getting to play all that often, I kept buying books all the way through high school.

Cue the same old story: went to college, boxed up all my stuff, didn't even bother to look for it again until a few years ago, and then somehow it all got lost during a couple of years of vagary. Then I ran into that other dude who writes for this thing, found out he was a former M:tG/Warhammer 40k nerd, and then it all started over again. I learned how to play 40k from him, and then while talking about gaming plans one day, I asked, "Ever played Battletech? That shit is awesome." So now we play both.

The real miniatures aspect of gaming is pretty new to me, as when I was a kid I didn't have the patience to paint shit. Now, however, I find it to be a relaxing hobby, and I'm working on learning all the techniques. I'll be sharing my trials and tribulations here, and hopefully the end results won't look too bad. My attempts on the crappy plastic minis from the boxed game haven't turned out all that bad so far, but I'm still learning, and my minis look nowhere near as good as the ones Rob paints.

Currently, I'm working on getting my crap together for GASPcon, where Rob and I will be participating in a few games, the highlight of which (for me) is bound to be the Battletech Poker Run. I'm painting up a few minis in preparation, with one extra because I didn't read the rules very closely before I decided to blow money on a new mini expressly for the con. In the next week or so, I'll be posting pics of a Bushwacker, a Mongoose, a Solitaire, and probably a Wolfhound and a Highlander as well.

So that's where I stand on this thing. The game has changed a lot in ten years, and it's been sold off a few times, leading to some weirdness (Battletech using the Clix system? Get the fuck out of here with that shit) but I'm pretty excited about a lot of the new material I'm seeing, and I'm really looking forward to gaming a lot more and posting it up. I figure I'll probably think differently after I get owned at that con, though...

Welcome(back)!!!

It all started in 1994 on a cold and rainy Saturday in November. Like many 13 year olds, I had already graduated from POG's to this new game called Magic: The Gathering. For me, it was like discovering crack and when I was handed a pack of cards in the boys locker room of Thompson Middle School, I knew I was hooked. When it comes to locker rooms, some guys find steroids, some find weed, I found a card game.

But I digress.

Fast forward a year to that day in November, 1994. I found myself in my fathers car being driven to a Magic tournament just outside of Philadelphia. I was going as a boy who played a boy's game, but little did I know I would leave that hotel ballroom a man.

I really blame this on my father. While I was off kicking ass (I won the tourney) he was over in the corner watching four overweight, balding men push little figurines around a 6x4 table covered with hills, forests, rivers and blown-out buildings. They looked like army men and the dice were the same ones he'd used so many times before while beating me up in Risk, but this wasn't just any board game. This, he'd find out, was Warhammer 40,000.

My life was about to change.

After the tournament was over, I found him and he introduced me to the middle-aged men huddled around the table. We watched for at least an hour as the battle played out and they explained to us what was going on. Each model had its own stats and dice were rolled to determine hits, misses, casualties, etc. It all made perfect sense! To top it off, the armies themselves were right out of the movies. Superhuman Space Marines blasting away at hordes of green-skinned Orks. The evil minions of Chaos who are hell-bent on conquering the galaxy while legions of vicious Tyranids devour entire worlds. This was it, I had found my place in the nerd-world. This wasn't just a game, it was a lifestyle.

As soon as we had gotten in the car I told my dad what I wanted for Christmas.


In my euphoria, I had overlooked one tiny detail. The models were supplied unpainted.


Thus, I give you...my very first Space Marine! Handsome, no?


If you look at the base, you'll notice I hadn't quite grasped the concept of shaking the paint before applying it.

Luckily with painting, like most things in life, the more you work at it the better you'll get and work I did. I spent the next six years buying, building and painting whenever I could. I was drawn to the forces of the Imperium and before long had amassed armies of Ultramarines, Imperial Guard and the Sisters of Battle.


Here's a picture of the new (circa 2001) Commissar Yarrick model I painted just before putting the hobby down and leaving for college. I like to think it's a little better than what's above.


So, here we are. I'm 28, out of school, gainfully employed, about to marry the woman of my dreams (who even supports this wild idea) and I've decided to get back into the hobby. While I'm at it, I figure there's gotta be someone else out there in my place so I might as well write about it! Ten years is a long time and I'm sure just about everything has changed except for the dice...unless...do you still roll a 12-sided die for wounds on a Krak Missile? No? Shit.